
Hey y’all, I want to share with you the settings I used related to rendering in Unity for these tutorials. These settings make a HUGE difference with respect to quality.
I highly encourage you to explore the meaning behind all of the settings I’m presenting to you. Read up on Forward vs. Deferred rendering; learn what anti-aliasing means; don’t just accept these settings and go. I’m still learning everything myself! And we’ll be much better off having power over these settings instead of constantly Googling why something isn’t working.
Player Settings
I feel like the Linear Color Space looks better and is more predictable to work with even for non-photorealistic projects, because the light color that shaders receive increases linearly with light intensity. However, as noted in the Unity documentation, this is only supported on PC and certain newer mobile and console hardware. Choose this setting at the very beginning of starting a project, as it can drastically change what your lighting looks like.

General Lighting Settings
Since this is a stylized world, I don’t want to use Unity’s default skybox. You might use your own stylized skybox; for these tutorials, I use an ambient color for environment lighting rather than the skybox.
These settings are under Window -> Lighting -> Settings.

Camera Settings
I also don’t want to SHOW the skybox, so I have the camera Clear Flags set to Solid Color. This is how I get the pink background! Again, you might have your own nice skybox; this is just the setting I used to get the look from the tutorial.
Make sure to fiddle with your Field of View and Clipping Planes settings to get the perspective you want for your world. If you want an isometric look, set the Projection to Orthographic.
I also set the Rendering Path to Forward. You can also set this globally under Edit -> Project Settings -> Graphics. You can read about which rendering path to choose in the Unity documentation on graphics.
Notice also the little message that says “Info: renders Depth Texture” at the bottom. This is achieved through a script attached to the camera, and is important for certain special effects like the foam line on water tutorial. Some other camera properties that you want might not be exposed in the inspector.
These settings are on your main Camera in your hierarchy.

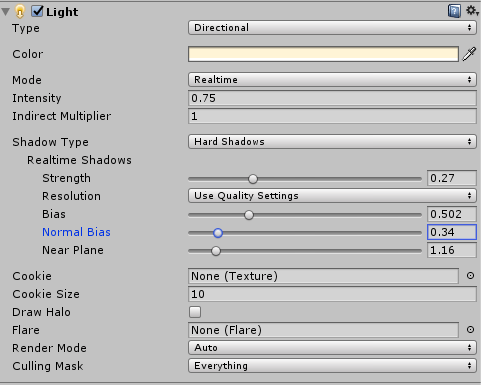
Directional Light Settings
In addition to the environment light being tinted, I love to tint the color of the scene’s main directional light. I encourage you to play with this and see the look it achieves.
I also turn down the Intensity of the light and change the Shadow Type to Hard Shadows, which both look much better with the cel shading that I use. Make sure to also fiddle with your Shadow Strength.
If your shadow edges have weird artifacts, fiddle with the Bias and Normal Bias settings on your shadows.
These settings are on any directional light in your hierarchy.
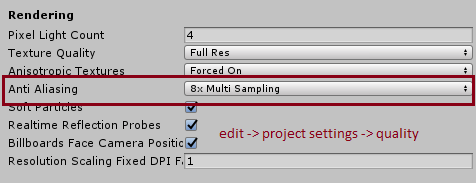
Quality Settings
Anti-Aliasing caaaan affect performance, but for the purposes of these tutorials, I crank it up all the way to 8x. Of course, disabling it gives its own kind of stylized look, too. Try both and see how it affects your project.
Fin
I hope y’all found this useful! Let me know if there are any other graphics or quality settings that YOU use to enhance your projects. And be sure to check out the shader tutorials that use these settings ^^
If y’all have any questions about writing shaders in Unity, I’m happy to share as much as I know. I’m not an expert, but I’m always willing to help other indie devs 🙂
Good luck,
Lindsey Reid @so_good_lin

10 thoughts on “Unity Graphics Setup”