

DISCLAIMER #1: Code presented here is pseudocode that does NOT necessarily reflect production Limit Theory code.
DISCLAIMER #2: This tutorial assumes you have at least basic knowledge of 3D geometry and related math.
The torus is probably my favorite shape right now because of the contrast between how daunting it looks to build and how beautifully simple it actually is. I never thought I would be good at math, much less enjoy it, but here I am, a professional graphics programmer, loving and learning math-heavy algorithms. Visualizing math made all the difference. The torus is a stunning example of how beautiful math can actually be, once you get away from dry, academic, rote math and into the applied realms of proceduralism, graphics, and games.
I want to take the time to explain why these algorithms work on a conceptual level. If you understand why they work, it’s an easy leap from the simple torus on the left of the header image to the fancy torus on the right.
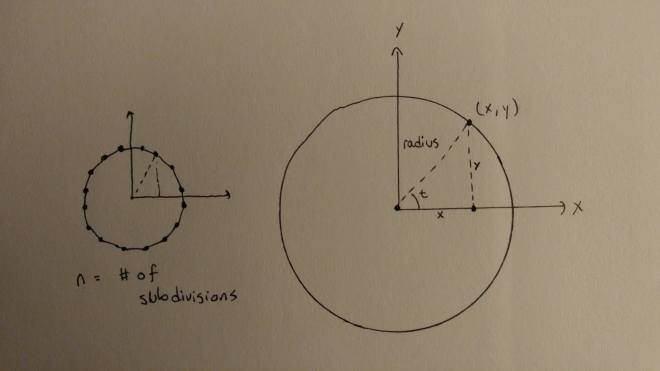
If you’ve ever coded a circle before, you know that the algorithm for the position of every vertex on the circle looks like this (substitute n with however many subdivisions you want):
verticies = {}
dt = (2*pi)/n
for t = 0, 2*pi, dt
  v = Vec2()
  v.x = cos(t) * radius
  v.y = sin(t) * radius
  verticies.add(v)
end
The next step to bring this circle into a torus shape is to take the circle shape and translate and rotate it in a circle. Pretend the torus is a donut (mmm). The thick part of the donut is what I call the “inner” part of the torus, and the hole in the middle is the “outer” part. The thick part of the donut is a circle that’s been looped around in a circle. The way we create this shape is by adding the radius of the inner circle (the thick part of the donut) to the radius of the outer circle (the hole in the donut). If you carefully analyze the inner loop for the torus algorithm below (bolded), you’ll see there are 2 nested functions for circles.
-- input - all arbitrary
st = 15 -- number of times we draw a ring
sl = 15 -- number of subdivisions of the ring
innerR = 1 -- inner radius
outerR = 5

 -- ring radius (thick part of donut)
phi = 0.0
dp = (2*math.pi) / sl
-- torus radius (whole donut shape)
theta = 0.0
dt = (2*math.pi) / st

verticies = {}
for stack = 0, st do
  theta = dt * stack
  for slice = 0, sl do
    phi = dp * slice
    v = Vec3()
    v.x = cos(theta) * (outerR + cos(phi) * innerR)
    v.y = sin(theta) * (outerR + cos(phi) * innerR)
    v.z = sin(phi) * innerR
    verticies:add(v)
  end
end

Finally, we need to compute the indicies for the torus. There’s both good and bad news for the algorithm I use below.
The good news is: this algorithm works for any of the torus shapes I’m about to show you, including the complicated on on the right of the header image. ;0
The bad news is: this algorithm stores duplicate locations at the “seams” of the torus, where the first index for each slice meet the last. Should you want to calculate normals or do some other operation with this mesh, make sure you either 1) fix that first (good luck, lmk when you figure that out) or 2) protect those algorithms against bad tris.
tris = {}
for stack = 0, st - 1 do
  for slice = 0, sl do
    i1 = stack + (slice * sl)
    i2 = (stack +1) + (slice * sl)
    i3 = stack + ((slice +1) * sl)
    i4 = (stack +1) + ((slice +1) * sl)
    tris:add(i1, i3, i4)
    tris:add(i1, i4, i2)
  end
end

WOO!! I’ve you’ve gotten here, and your torus works, you’ve made it past the hard part. Hopefully you see by now the beauty of a torus: it’s simply a nested function of circles. The secret to drawing all kinds of crazy shapes with this algorithm is to realize that a torus is simply a nested parametric equation. For the purposes of graphics programming, let’s simplify the definition of parametric equations to: a set of equations that are all a function of a variable angle theta. And for our case, those equations describe the (x,y) or (x, y, z) Cartesian coordinates of a vertex v.
t = 0 to 2*pi:
x = parametric(t)
y = parametric(t)
z = parametric(t)
Knowing this, we realize that we could substitute any parametric equation in to the algorithm above. Let’s call the functions for the shape of the entire torus “outerFn”, with the function of the y-position “outerFn.y” and the function of the x-position “outerFn.x”. Similarly, the inner functions for x and y are “innerFn.x” and “innerFn.y”. The generalized version of our torus algorithm now looks like this:
v.x = outerFn.x(theta) * (outerR + innerFn.x(phi) * innerR)
v.y = outerFn.y(theta) * (outerR + innerFn.x(phi) * innerR)
v.z = innerFn.y(phi) * innerR
For example, let’s say we want to use a hypotrochoid, a curvy-diamond looking parametric function, for our outer shape instead of a circle.
Given that the equation for a hypotrochoid can be simplified to the following, with optional constants a & b:
x = a*math.pow(math.cos(t),3)
y = b*math.pow(math.sin(t),3)
Our torus function now looks like this:
v.x = a*math.pow(math.cos(t),3) * (outerR + cos(phi) * innerR)
v.y = b*math.pow(math.sin(t),3) * (outerR + cos(phi) * innerR)
v.z = sin(phi) * innerR
I highly recommend plugging whatever functions you want to experiment with into Wolfram Alpha to see what they look like in 2D first. Beware that many complicated, especially looping, parametric functions will result in inverted normals. (You might try turning backface culling off in your shader to support them.) You could continue to get creative with this function by passing in even more optional constants (like a & b) or by randomizing what parametric function you use. Here are just a few simple examples:


Ta-daa! You’ve made it all the way to the end. If you enjoyed this tutorial, … uh, wow, you’re a huge nerd. Be sure to check out my other tutorials on procedural geometry, including mesh extrusion and mesh stellation, fellow graphics geek 🙂
If you enjoyed this tutorial, see any typos or bugs, or have any other feedback, leave me a comment or tweet at me! You can follow me here on WordPress or on Twitter @so_good_lin. And be sure to keep track of @LimitTheory on Twitter – when it comes out, the production version of all of this code & more will be available for exploring and modding. 🙂
DISCLAIMER: Code presented here is pseudocode that does NOT necessarily reflect production Limit Theory code.

One thought on “Procedural Torus Tutorial”