

After I posted my cel shader tutorial, I asked for more tutorial ideas on Twitter. A mutual of mine requested help:
I have a monster in mind that fades into invisibility. Perhaps a distorty purply glassy misty spooky type shader for the in-between? 😀
— Brannan Vitek (@brannan_vitek) November 6, 2017
Welp, here’s that tutorial, Brannan! XD It doesn’t have ALL of the qualities that you requested, but I think it does the trick for a magical-fade effect.
With this shader, you’ll be able to tune the color, speed, fade speed, size, and texture of the dissolve. For example, in the gif below, the green lingers longer, and the dissolve happens faster.
For reference, here’s the final code for the shader. Note that it includes code for a cel shader, so if you want to use the effect in your own lighting scheme, you’ll need to adapt this code for your needs.
–> Link to final code for Unity Dissolve Shader
The Basic Dissolve Effect
Let’s start with the simplest version of this effect- no edge colors or fade, just the dissolving animation.
The way we create the grainy texture of the dissolve is by sampling a noise texture, like the one below. This texture can be in any pattern or color, but the result will look best if it has a pattern of colors that range from 0 brightness to full brightness– for example, shades of gray between black and white.
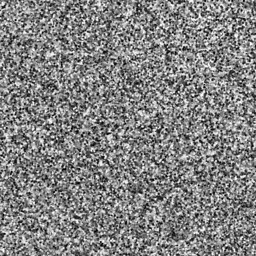
To test that you’re able to correctly sample the noise texture, use this code in your fragment shader:
// sample noise texture
float noiseSample = tex2Dlod(_NoiseTex, float4(input.texCoord.xy, 0, 0));
// output greyscale color based on noise value
return float4(noiseSample, noiseSample, noiseSample, 1.0);
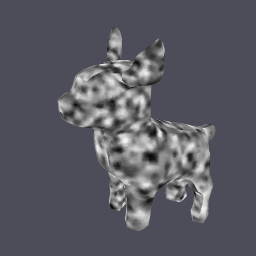
You should now see the noise texture on your model. Note that this gives you a preview of what the dissolve shapes will look like.
Now, for the animation. At every frame, we sample the noise texture and then compute:
if ((noiseValue – time * dissolveSpeed) < 0)
delete the current pixel
As time increases, time*dissolveSpeed increases, and thus the threshold for not being deleted increases. The darker pixels on the noise texture give a lower noiseValue, so their corresponding pixels in the shader are deleted first; then the gray pixels follow; and lastly, the white pixels disappear. The different speeds of deletion per pixel give us the grainy texture of the dissolve.
The fragment shader code for dissolving looks like this (note that you can fit this with any kind of lighting scheme or other shading):
// sample noise texture
float noiseSample = tex2Dlod(_NoiseTex, float4(input.texCoord.xy, 0, 0));
// determine deletion thresehold
float threshold = _Time * _DissolveSpeed;
// 'clip'
clip(noiseSample - threshold);
Your simple dissolve should look something like this:

Dissolve Borders
To create the colored borders around the dissolving area, we do almost the same technique as the basic dissolve, but with faster dissolve speeds. These pixels appear to be ‘dissolving’ faster than the deleted pixels, but instead of deleting them, we change the output color.
Let’s start with just 1 dissolve color. Assume we have a basic color, pre-dissolve, for the mesh called ‘color’. We also have to define a unique parameter for the edge dissolve speed, which needs to be tuned higher than the deletion dissolve color.
Note that useDissolve will compute to either 1 or 0. That way, when we add (1-useDissolve)*color + useDissolve*_DissolveColor, we’ll cancel out one of them. This kind of statement avoids using ‘if’ statements, which are expensive to use in shaders.
// sample noise texture
float noiseSample = tex2Dlod(_NoiseTex, float4(input.texCoord.xy, 0, 0));

// determine edge threshold
float thresh = _Time * _ColorThreshold;
// determine if noiseSample passed threshold
float useDissolve = noiseSample - thresh < 0;
// cancel out EITHER base color OR edge color
color = (1-useDissolve)*color + useDissolve*_DissolveColor;

// determine deletion threshold
float threshold = _Time * _DissolveSpeed; clip(noiseSample - threshold);
For each successive color- and you can add as many as you want!- you just need to define a new color and dissolve speed. Each successive color requires a higher dissolve speed in order to show up. Here, useDissolve2 is calculated BEFORE useDissolve1, and requires a higher dissolve speed.
// sample noise texture
float noiseSample = tex2Dlod(_NoiseTex, float4(input.texCoord.xy, 0, 0));

// add edge colors
float thresh2 = _Time * _ColorThreshold2;
float useDissolve2 = noiseSample - thresh2 < 0;
color = (1-useDissolve2)*color + useDissolve2*_DissolveColor2;

float thresh1 = _Time * _ColorThreshold1;
float useDissolve1 = noiseSample - thresh1 < 0;
color = (1-useDissolve1)*color + useDissolve1*_DissolveColor1;

// determine deletion threshold
float threshold = _Time * _DissolveSpeed;
clip(noiseSample - threshold);
With two colors, your shader should now look something like this:

Fade
The fade is the simplest part of this tutorial. After all of the edge colors have been calculated, subtract time from the alpha value of the output color.
‘Saturate’ is a CG function that clamps the output value between 0 and 1. Try removing it and see what happens 😂
color.a -= saturate(_Time * _FadeSpeed);
Ta-daa! Your completed shader, with the dissolve, colored edges, and fade, should look something like the header image. ^^
Fin
For reference, here’s the link to the final code for the dissolve shader. Again, note that this code also incorporates a cel-shaded lighting scheme with shadows. This allows you to use it immediately without writing your own lighting scheme, but if you want to incorporate the dissolve code with your own shader, you’ll need to pull only the dissolve-related stuff out.
If y’all have any questions about writing shaders in Unity, I’m happy to share as much as I know. I’m not an expert, but I’m always willing to help other indie devs 🙂
Good luck,
Lindsey Reid @so_good_lin
PS, here’s the Unity graphics settings for this tutorial.

Hi Lindsey,
Great tutorial, super easy to follow and learn. Thank you so much.
I have a few questions : should the values `_ColorThreshold1` and `_ColorThreshold2` be called speeds instead of tresholds ? They follow the same logic as the `_DissolveSpeed` value and the two color treshold/speed have a relationship with the dissolve speed (they must be greater than the dissolve speed).
Also, the line
`color.a -= saturate(_Time * _FadeSpeed);`
is not in the file dissolve.shader that is linked in the tutorial. Is that intended and something flew over my head ?
LikeLiked by 1 person
Ah, thank you for pointing out the differences between the code here & the code on the GitHub repo. Sometimes I experiment with the shaders after writing the tutorial, push the changes, and forget that code is linked here XD The line you pointed out (color.a -= staturate…) does the overall alpha fade effect, but doesn’t affect the dissolve effect. So while it is intentionally a part of this tutorial, it’s optional.
I also noticed some typos about using _ColorThreshold1 and 2. They should be using separate variables, which I correctly renamed “thresh1” and “thresh2”. I called them “threshold” instead of “speed” because they have a binary relationship to whether or not the color shows, which I think the word “threshold” implies, but you could also call them speed if you want. You’re not wrong in your assessment.
Thank you so much for the comment, let me know if there’s anything else I can help with!
LikeLike