

Mercy and certain other characters and powers in Overwatch have a cool effect that draws players in front of walls. Mercy’s looks like this:

Notice how, in this image, the D.Va is drawn as a solid translucent color. The translucency applies to the model itself such that it looks like you can see the inside of the model and its backfaces.
In this tutorial, we’re going to learn how to replicate this effect!
For your reference, the full code for the x-ray shader is here, under a non-commercial open-source license. 🙂
The Z and Stencil Buffer
This effect heavily relies on controlling how the fragments of our material appear to overlap or occlude its own fragments and other fragments in the scene.
Our overlap logic looks like this:
- The basic pass (with the texture and lighting) always replaces the x-ray passes
- When not occluded by the basic pass, the x-ray passes draw on top of everything else
- The x-ray effect has 2 translucent passes for front and back faces in which front faces draw on top of back faces
To do this, we first need to understand the depth buffer and stencil buffer. The depth (or “z”) buffer is used to ensure that objects closer to the camera draw on top of objects farther away from the camera. (An object’s z-position describes its distance from the camera in Unity’s coordinate system, which is why it’s also called the z-buffer in Unity and other programs with a similar coordinate system.)
The stencil buffer is used to override the z-buffer tests and create special effects by discarding or replacing pixels based on configurable tests.
In addition, we need to understand culling. Culling means not drawing vertices based on whether or not they’re facing the viewer. The default setting for objects is backface culling, which means we won’t draw vertices that are facing away from the viewer.
You may also want to reference Unity’s documentation for the culling and depth testing and the stencil buffer for more information.
Drawing the X-Ray Pass On Top of Stuff
First of all, you’ll need to make a new Pass for the x-ray effect that draws AFTER whatever basic lighting/ texturing pass you have. This effect can go on top of any passes that don’t already have conflicting z-buffer or stencil buffer settings.
Now, let’s harness a basic property of the z-buffer by… basically turning it off 😛
We can configure the depth buffer settings for a shader pass in Unity with the ZWrite and ZTest tags. ZWrite allows us to configure whether or not the fragment should write to the depth buffer at all, and ZTest allows us to change how the depth buffer test should behave.
Since we want our x-ray pass to draw on top of everything, our settings will be:
ZWrite Off – this means the pass won’t write to the depth buffer
ZTest Always – this means the pass will always pass; meaning, it will always draw on top of other passes
Here’s what our pass looks like in-between the Pass and CGPROGRAM tags:
Pass {
  Tags
  {
    "Queue" = "Transparent"
  }

  ZWrite Off
  ZTest Always

  Blend SrcAlpha OneMinusSrcAlpha
  CGPROGRAM //... shader stuff
Notice that we’re also going to draw this pass in the Transparent queue and with standard alpha blending (configured in the Blend tag) so that we can draw it translucent.
The shader itself is super simple. Our fragment shader is just going to return a flat color with a translucent alpha. Mine is a bright green with an alpha value of about 30%.
Your result should look something like this:
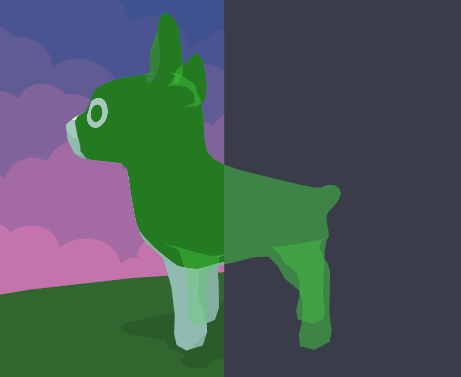
Notice how only our x-ray effect is drawing in front of walls, but our regular pass isn’t!! Woohoo!!
However, the x-ray pass is still drawing on top of our regular pass, which we don’t want. Let’s fix that!
Drawing the Regular Pass On Top Of the X-Ray Pass
Now, our stencil buffer knowledge comes into play. We’re going to use the stencil buffer to discard x-ray pass fragments wherever basic pass fragments have drawn.
Basic Pass
To do this, we first need to tell the basic pass to write to the stencil buffer:
Stencil {
  Ref 4
  Comp always
  Pass replace
  ZFail keep
}
Ref 4 tells the buffer that this pass’s reference value is 4, which is used in the stencil buffer comparison test. This number can be any integer from 0 to 255; its relation to the other values in the stencil buffer is more important than its actual value.
Comp always means the stencil buffer test will always return ‘pass’.
Pass replace means that when the fragment passes the stencil buffer test (which is always, as defined above) it will replace whatever value was in the stencil buffer with our reference value (4).
ZFail keep means that the fragment will still use the z-buffer to test for depth.
X-Ray Pass
Now, we need to tell the x-ray pass to read from the stencil buffer, and not draw when it sees a reference value greater than 3. That way, when it sees 4, the value of the basic pass, it won’t draw! Here’s what it looks like:
Stencil {
  Ref 3
  Comp Greater
  Fail keep
  Pass replace
}
Ref 3 means this pass’s reference value is 3.
Comp Greater means the comparison test will ‘pass’ when the value already in the stencil buffer is greater than this fragment’s reference value (3).
Fail Keep and Pass Replace mean that this fragment will be not draw when the comparison test fails and draw when it passes. ‘Keep’ and ‘Replace’ refer to what to do with the value already in the stencil buffer; as in, ‘keep the value in the stencil buffer’ or ‘replace the value with MY value’.
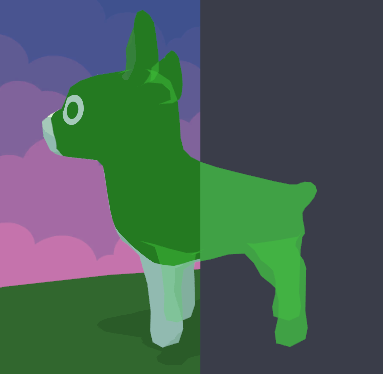
Result
You should now have your x-ray pass only drawing where your object is behind a wall or other objects!
This is because we told it to always draw on top of stuff (using the z-buffer) unless the basic pass has already drawn (using the stencil buffer).

Drawing Two X-Ray Passes
You could totally stop here and have a functional x-ray pass. The x-ray pass could do whatever you want to with texturing, lighting, or other effects in that single pass if you want!
However, for the x-ray effect to better emulate the Overwatch effect, we’ll need to draw both the front and back faces of the mesh. To do that, we need to draw it in two passes: in the first pass, we’ll cull front faces; in the second, we’ll draw back faces.
Why can’t we just use a single x-ray pass and turn culling off? Welllll, because we’ll get weird artifacts depending on the (kinda unpredictable) order that the faces will draw in the z-buffer. Sometimes, the back faces will draw in front of the front faces. Here’s an example from Unity’s documentation of what that can look like:

So, we’ll have to split up this job into two passes to ensure that the back faces draw before the front faces.
Firstly, tell the first x-ray pass to cull front faces (ie, only draw back faces):
Cull Front // draw back faces
Now, add the second x-ray pass. Copy the vertex and fragment shader set-up, but remove the stencil buffer stuff (for now) and set culling to Back.
Pass {
  Tags {
    "Queue" = "Transparent"
  }

  Cull Back // draw front faces
  ZWrite Off
  ZTest Always
  Blend SrcAlpha OneMinusSrcAlpha

  CGPROGRAM //... shader stuff
Without the stencil buffer set up, your second x-ray pass should draw on top of everything, including the basic pass. However, with culling configured correctly, your x-ray should now be showing the inside of the model!
To get our second pass to discard where it sees the basic pass, we’ll need to do some tricky configuring with the stencil buffer.
We don’t want to use the exact same stencil buffer settings, otherwise the second x-ray pass won’t draw at all. This is because we don’t want our second pass to replace the first x-ray pass pixels.
Instead, we’ll make the ref value 4 and check if it equals the stencil buffer value:
Stencil {
  Ref 4
  Comp NotEqual
  Pass Keep
}
Ref 4 means our reference value is 4; most importantly, this is equal to the reference value of the basic pass.
Comp NotEqual means this test will pass when the value in the stencil buffer is equal to our reference value.
Pass Keep means we’ll keep whatever value is in the stencil buffer when our test passes. IE, we WON’T draw our pixel when the reference values are EQUAL.
Once we’ve got all of these settings configured, you should successfully be drawing both of your x-ray passes on top of other objects but under the basic pass!

Fin
Woohoo, you did it! This was quite a complicated use of the stencil and z-buffers. I hope you feel inspired to keep using them in creative ways 😀
Feel free to reference the full code for the x-ray shader if you’re still having trouble! 🙂
If you enjoyed this tutorial, consider supporting me on Patreon! You’re probably reading this as a Patron with early access anyway, but remember you get to vote on tutorial topics if you sponsor $5+ 🙂 This topic was voted on today (3/17/18) by Patrons!
If y’all have any questions about writing shaders in Unity, I’m happy to share as much as I know. I’m not an expert, but I’m always willing to help other indie devs 🙂 And do give me feedback about the tutorials, I love hearing from y’all!
Good luck,
Lindsey Reid @so_good_lin

Hi there, this site does the stencil effect in a very simple way:
LikeLike
how to do this in shader graph?
LikeLike