

If you want your game to have a unique aesthetic, a great way to accomplish that is to have all of your objects using a shader that you personally wrote for the game. The only lighting scheme I’ve written about so far is cel shading, but that’s not the only way to go about stylized looks!
So, I decided this tutorial series needed a post on diffuse shading. Lots of tutorials have already covered diffuse shading in lots of languages, so this post also has a few ideas for ways to improve and expand upon a basic diffuse shader.
In the header image, the watermelon slice is using Unity’s default diffuse shader; on the right, it’s using the shader we write during this tutorial!
We’re going after a stylized look, so the ideas presented here introduce some basic ideas and skip over others. This is certainly not the ‘best’ way to write a diffuse shader, and there arguably isn’t one single ‘best’ way- there’s just what’s best for your game!
For your reference, here’s the final code for the simple diffuse shader in Unity.
Now, on with the tutorial!
Basic Diffuse Shading
Diffuse shading is calculated by taking the dot product of the light vector and the surface normal. A “surface normal” is a vector describing the direction a surface is pointing in.
This works because a dot product, put simply, is a product between two vectors that tells us about the angle between the vectors. And in this case, the two vectors are the direction of the light and the direction that the surface is pointing in, which means the dot product tells us about the angle between the light and the surface.
Let’s visualize it:

In this drawing, the solid arrows coming from the sphere represent the surface normals at each point on the sphere, and the dotted arrows represent the direction of the incoming light.
The dot product between these vectors gives us a scalar (a single number) that describes the angle between these vectors. That value is:
- between -1 and 1
- greater than 0, when the vectors are at at an angle < 90°
- 0, when the vectors are perpendicular (at exactly a 90° angle)
- less than 0, when the vectors are at an angle > 90°
What this translate to for lighting is a higher value of the dot product means the lighting should be stronger. In addition, values of 0 or below should have no lighting at all, as they are facing perpendicular to (0) or away from (< 0) the light source.
In the fragment shader, let’s go ahead and get the light direction and the dot product between the light and the surface normal:
// _WorldSpaceLightPos0 provided by Unity
float3 lightDir = normalize(_WorldSpaceLightPos0.xyz);
// get dot product between surface normal and light direction
float lightDot = dot(input.normal, lightDir);
So, we want to translate that higher value of lightDot = more light. In addition, any value of 0 or below isn’t helpful to us, as it always means there should be 0 lighting.
Since we’re therefore only interested in values between 0 and 1, let’s go ahead and clamp the value to 0-1 by calling the cg function saturate.
lightDot = saturate(lightDot);
Now that we have our lighting ready, let’s sample the main texture to get the ‘albedo‘ (or basic flat color) of the material.
float4 albedo = tex2D(_MainTex, input.texCoord.xy);
Now, to apply lighting to the albedo color, all we need to do is multiply the albedo color by our lighting scalar!
This works because the value of lightDot, which is between 0-1, lowers the values of albedo when multiplied by them, and lower RGB values become darker. The lower lightDot, the lower the output values will be.
float3 color = albedo.rgb * lightDot;
// ignoring any alpha (transparency) and just outputting 100% alpha for now
return float4(color, 1.0);
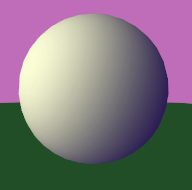
Applied to a plain old sphere, your shader should produce something like this:
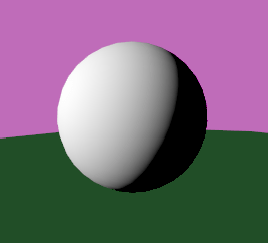
That shadow’s pretty harsh, huh? Let’s brighten it up a little by applying the ambient light from the scene. This isn’t your directional, main scene lighting- it’s basic lighting configured in “environment lighting” under your Lighting settings (window > Lighting).
ShadeSH9 does the lighting calculations for you; all you need to do is input your surface normal:
color += ShadeSH9(half4(input.normal, 1));
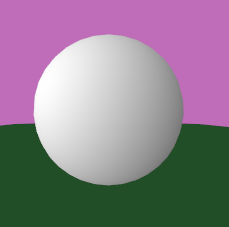
And your sphere probably looks more like this:

If you want to change the intensity of the ambient lighting, you can do so by tuning it in the Lighting window or by multiplying the ambient lighting by a scalar value in your shader.
Our basic diffuse fragment shader then looks like this:
float4 frag(vertexOutput input) : COLOR
{
  // _WorldSpaceLightPos0 provided by Unity
  float3 lightDir = normalize(_WorldSpaceLightPos0.xyz);

  // get dot product between surface normal and light direction
  float lightDot = dot(input.normal, lightDir);

  // sample texture for color
  float3 color = tex2D(_MainTex, input.texCoord.xy).rgb;

  // add ambient light
  color += ShadeSH9(half4(input.normal, 1));

  // multiply albedo and lighting
  float3 rgb = color * lightDot;
  return float4(rgb, 1.0);
}
Basically, if you want to write your own diffuse shader instead of using Unity’s default one, you’ll need to do a little tweaking to get something you think looks good. In the next section, we’re going to go over a few ideas that I used to do just that!
Smoother Diffuse Shading
The Algorithm
My primary complaint with the basic diffuse lighting calculation is that the lighting dropoff is way too fast- that is, the transition between the lit area and dark area is super thin.
So, let’s do some math to figure out how to make that transition space longer. Right now, our calculation for the lighting scalar looks like this:
// get dot product between surface normal and light direction
float lightDot = saturate(dot(input.normal, lightDir));
One of the problems here is that the dot product returns a value (-1, 1), but we’re clamping it to (0, 1) with saturate. That means that a huge number of our values will be 0 that could otherwise be used to calculate more interesting information.
So, let’s remove the call to saturate and focus on using all of the dot product values from (-1, 1) to get more varied input data.
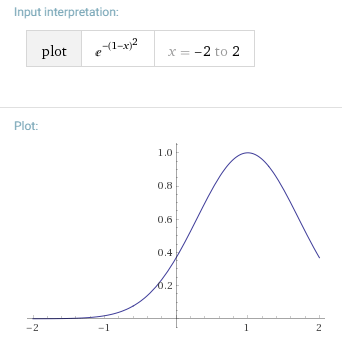
Let’s also put lightDot through a function which will more smoothly distribute. Algorithms like these are sometimes common knowledge among graphics programmers, and sometimes something that you’ll come up with just by fiddling with them. I encourage you to get familiar with the graphical output of simple algorithms like e^x, and to experiment with what they do in shaders, to get familiar with how you can harness them.
// get dot product between surface normal and light direction
float lightDot = dot(input.normal, lightDir);
// do some math to make lighting falloff smooth
// exp(a) = e^a
// pow(a, b) = a^b
lightDot = exp(-pow(_K*(1 - lightDot), _P));
Don’t for get to add _K and _P to your Properties and define them inside the shader. You’ll probably also want to remove the ambient lighting calculation in order to tune these accurately.
Here’s what we’re starting with BEFORE adding the algorithm, and without any ambient lighting:
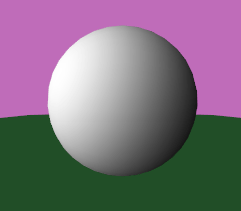
Here’s what your output will look like with the algorithm, but without tuning (K=P=1):
And here’s what I got with tuning (specifically, K = 2 and P = 1.3):
Fixing the Black Spots
We still have one problem left to solve! You may notice that in the brightest areas of the objects, instead of highlights, you get black spots. Here’s an example of a burger mesh with a normal map applied:
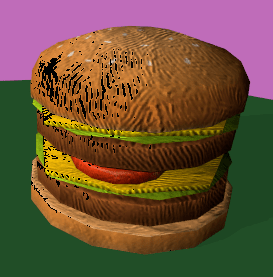
This is because the dot product value lightDot is sometimes returning values slightly greater than 1. If we graph what the output of our algorithm looks like from (-2, 2), we’ll see that input values even a little bit greater than 1 suddenly start to cause the output to decrease:
The solution to this is to clamp the dot product between (-1, 1). Those are our expected output values of a dot product anyway! As to why the dot() function returns a value slightly > 1… I am not so sure.
Here’s what our corrected code looks like for getting lightDot:
float lightDot = clamp(dot(input.normal, lightDir), -1, 1);
And here’s what our burger looks like now:

Final Code
Here’s what our fragment shader with smooth diffuse lighting looks like:
float4 frag(vertexOutput input) : COLOR
{
  // _WorldSpaceLightPos0 provided by Unity
  float3 lightDir = normalize(_WorldSpaceLightPos0.xyz);

  // get dot product between surface normal and light direction
  float lightDot = clamp(dot(input.normal, lightDir), -1, 1);
  // do some math to make lighting falloff smooth
  lightDot = exp(-pow(_K*(1 - lightDot), _P));  // sample texture for color
  float4 albedo = tex2D(_MainTex, input.texCoord.xy);

  // ignore ambient light while tuning  //albedo += ShadeSH9(half4(input.normal, 1));  // multiply albedo and lighting
  float3 rgb = albedo.rgb * lightDot;
  return float4(rgb, 1.0);
}
Why the Algorithm Works
Curious about how this algorithm works? Here’s a little insight.
The dot product of two vectors a and b is equivalent to
|a||b|cos (ϴ)
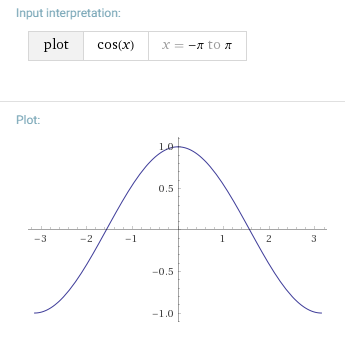
where ϴ is the angle between the vectors, and |a| and |b| are the magnitudes of a and b. Since we normalized a and b- that is, they have a magnitude of 1- then the dot product is simply the cosine of the angle between them.
Thus, the distribution of the dot product from the first line alone (dot(input.normal, lightDir)) outputs values that look like this, with x being the angle between the two vectors, and the output being our dot product value:
In contrast, here’s what the algorithm output looks like after we run that output through our fancy algorithm:
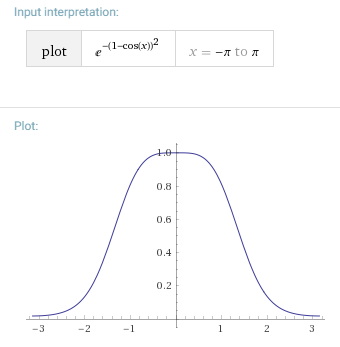
Notice how, the second graph, the output is naturally clamped between (0, 1), allowing us to better utilize all of the information between (-pi, 0).
Colored Highlights & Shadows
You may notice that the watermelon on the right in the header image has a blue-ish tint to its shadows. We can use some very simple math to tint the highlights and shadows of our shading, which gives a super nice artistic effect that’s a bit more interesting than plain black and white shadows.
Firstly, let’s add two Colors to our Properties for the highlight and shadow colors:
_BrightColor("Light Color", Color) = (1, 1, 1, 1)
_DarkColor("Dark Color", Color) = (1, 1, 1, 1)
And don’t forget to define them inside the shader, inside the CGPROGRAM tags.
Next, we’re going to use lightDot to decide whether our lighting should be closer to our dark color, our light color, or somewhere in-between. Since we know that lightDot is between (0, 1), we can linearly interpolate between _DarkColor and _BrightColor using lightDot as a weight:
// lerp lighting between light & dark value
float3 light = lerp(_DarkColor, _BrightColor, lightDot);
Adding this line directly below the calculations for lightDot, we should now get something like this! I tuned _BrightColor to be a light yellow, and _DarkColor to be a deep purple:
You can find the final code for the whole shader, including smooth shading, ambient lighting, and colored lighting in the repository!
Fin
We tackled a ton of stuff in this tutorial, from basic diffuse lighting to more advanced shading and lighting techniques! I hope you learned a bit, even if you only use one technique out of this tutorial.
You can find the final code for this entire customized diffuse shader here. Everything covered in this tutorial is in the fragment shader.
If y’all have any questions about writing shaders in Unity, I’m happy to share as much as I know. I’m not an expert, but I’m always willing to help other indie devs 🙂 And do give me feedback about the tutorials, I love hearing from y’all!
Good luck,
Lindsey Reid @so_good_lin

Sorry sir , the first picture when you visualized vector of light sources may be wrong . if with that direction the dot vector will be equal -1 and saturate is 0 so i confuse about that con you explain it for me ?
LikeLike