

Hey, y’all! My friends Kytana Le, Lucien Ye, and I created a chill, atmospheric, color-based puzzle game called The Endless River during the 2018 Global Game Jam. I wrote all of the shaders used for this game (except for the bloom), and my favorite one is definitely the reflective water shader.
So, while it’s still fresh in my mind, I figured I’d write a tutorial about it! The waving effect is quite similar to the 3D water shader tutorial, but the reflectivity is a special Unity trick that I felt made it worth writing a whole tutorial about.
If y’all want to see another tutorial covering how I made the entire aesthetic for the game, including bloom, other post-processing effects (like the vignette), fog, animations, and other effects, please let me know!
If you have any other feedback or questions about these tutorials, don’t be afraid to PM me on Reddit, contact me on Twitter, or comment on this post ❤
For your reference during the tutorial, here’s the final code for this shader, under an open-source licence. The code isn’t my usual shader tutorial repository, but instead the repository for the whole game. 😉
-> Link to final code for Unity 2D Reflective Water Shader
On with the tutorial!
Flipped Reflection
First of all, we need to reflect the scene around the water and flip that reflection so it’s upside-down and mirrored.
The general steps for the reflection & flip are:
- Create a plane, and rotate it so it’s facing towards the camera
- Set up a 2nd camera to render to that plane
- Add a material to that texture
- Add a flip property to the shader
Let’s break those down…
1. Create a plane and rotate it so it’s facing towards the camera
Fairly straight-forward. I had to rotate it 90 degrees on the X-axis to get it to face towards the camera.
2. Set up a 2nd camera to render to that plane
Create a second camera in your scene (other than your camera tagged “main”) and drag the texture you created into the camera’s slot for “Target Texture“. This will make the camera’s output draw to the plane’s main texture, readable by whatever shader is applied.

Now, position the camera so that its view port is on top of whatever from the scene you want to reflect.
3. Add a material to that texture
To just get the simplest part of this shader working, let’s write a shader that just outputs the main texture.
Add a properties tag for your main texture (this is what the camera is drawing to):
Properties {
    _MainTex("Texture", 2D) = "white" {}
}
Pass the texture coordinates from the vertex shader to the fragment shader:
vertexOutput vert(vertexInput input) {
    vertexOutput output;
    output.pos = UnityObjectToClipPos(input.vertex);
    output.texCoord = input.texCoord;
    return output;
}
And output the color from your main texture:
float4 frag(vertexOutput input) : COLOR {
    // sample texture for color
    float4 albedo = tex2D(_MainTex, input.texCoord.xy);
    return albedo;
}
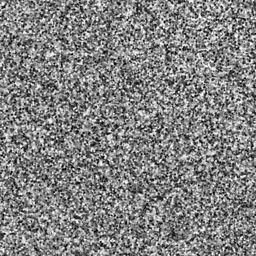
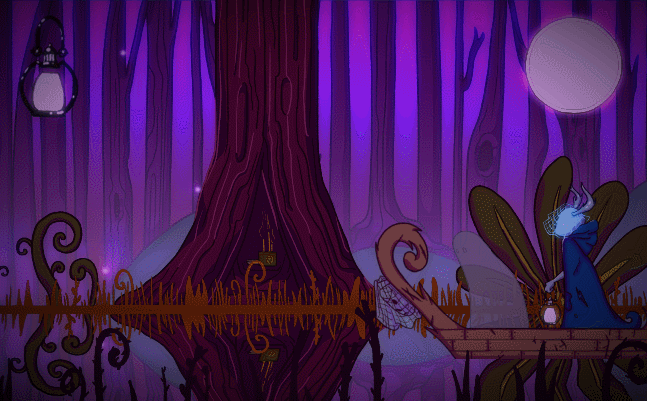
Create a material with your completed shader and add that material to your plane. If you’ve done everything correctly, your plane should now be displaying what your second camera sees- possibly flipped upside-down because we rotated the plane 😛
Your Scene view should now look something like this:

4. Add a flip property to the shader
Now, let’s modify the vertex shader to add a flip to this image. As you can see in the image above, the reflection isn’t quite mirrored, so we need to flip it on the x-axis.
To do this, we’re going to multiply the vertex position by -1. The negative value is what outputs the vertex in the mirrored position of the axis it’s flipped on.
First, add a vector property so that you can tune the flip. Tune any axes that you don’t want to flip to 1, and any axes that you DO want to flip to -1.
Properties {
    _MainTex("Texture", 2D) = "white" {}
    _Flip ("Flip", Vector) = (1, -1, 1, 1)
}
Now, in the vertex shader, multiply the vertex position with your flip vector.
Note that if you tune this numbers to any value other than 1, it’ll scale the image also.
vertexOutput vert(vertexInput input) {
    vertexOutput output;
    output.pos = UnityObjectToClipPos(input.vertex);
    output.texCoord = input.texCoord;

    // apply flip
    output.pos.xy *= _Flip.xy;

    return output;
}
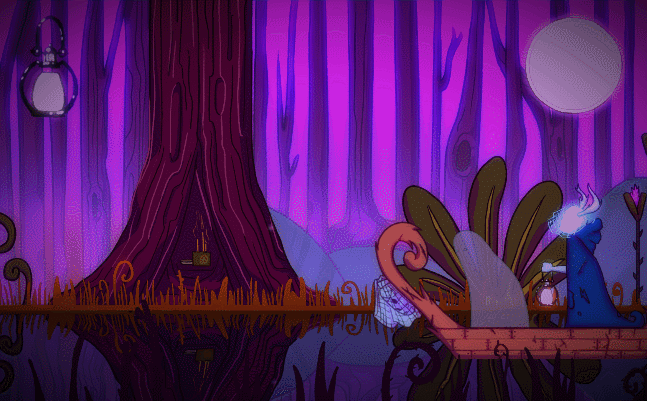
Your image should now be flipped, and properly look like a reflection of the world above it! You’ll probably need to fiddle with the size and position of your reflection camera and water plane in order to get the reflection looking good.
Also, at this point, my reflected image started moving around with my view of the Scene… don’t worry about it. Just make sure it looks good in your Game view!

Waving Water Effect
If you’ve read the 3D water tutorial, you’ll probably notice the text here is eerily similar… that’s because I use the same technique for both effects! But since this water is in 2D, we’re animating the vertex position on the X axis only instead of the X and Y axes. So here’s a refresher on how to do that!
To add animations to any shader, add Time to your algorithms. Unity gives you a built-in value for time called _Time. The wave algorithm looks like this:
- Sample a noise texture for a random value, which creates the non-uniform-ness of the waves
- Create a wave value by taking sin(time * noiseValue), which creates the oscillating motion
- Add the wave value to the vertex position
There are many different ways to create random values in shaders, so you can use whichever method you prefer for step #1. If you’re new to shaders and want to skip writing your own noise function, however, you can just sample a noise texture like this one:
Taking sin(time) ensures that our random value oscillates back and forth with time, which is what creates the wave-like motion.
The randomness then ensures that the motion is different for each vertex, otherwise we’d end up with the whole texture waving back and forth.
Firstly, make sure to add a spot in your Properties for the noise texture, and tuning values for the wave frequency and amplitude:
Properties {
    _MainTex("Texture", 2D) = "white" {}
    _Flip ("Flip", Vector) = (1, -1, 1, 1)
    _NoiseTex("Noise Texture", 2D) = "white" {}
    _WaveSpeed("Wave Speed", float) = 1.0
    _WaveAmp("Wave Amp", float) = 0.2
}
Here’s what the vertex shader now looks like:
vertexOutput vert(vertexInput input) {
    vertexOutput output;
    output.pos = UnityObjectToClipPos(input.vertex);
    output.texCoord = input.texCoord;

    // apply flip
    output.pos.xy *= _Flip.xy;

    // apply wave animation
    float noiseSample = tex2Dlod(_NoiseTex, float4(input.texCoord.xy, 0, 0));
    output.pos.x += cos(_Time*_WaveSpeed*noiseSample)*_WaveAmp;

    return output;
}
Woohoo!! Once you’ve tuned those WaveSpeed and WaveAmp values to your liking, your texture should now be animating like this (and probably looking even more fucked up in the Scene view 😂):
Adding Color
The final effect to really sell that this is a body of water is to darken and color the water. And that’s easy- you’ve already made it past the hard part!
All you need to do is add a _Color property, tune it, and multiply your output color by it:
float4 frag(vertexOutput input) : COLOR {
  // sample texture for color
  float4 albedo = tex2D(_MainTex, input.texCoord.xy);

  float3 rgb = albedo.rgb * _Color.rgb;
  return rgb;
}
And now, your water should look like the final effect!
Fin
You made it!!! I hope this tutorial helped you learn something about visual effects in Unity or shaders in general.
Here’s the full code again, under an open-source license.
And don’t forget to download the full game, The Endless River, from Itch.io!
If y’all have any questions about writing shaders in Unity, I’m happy to share as much as I know. I’m not an expert, but I’m always willing to help other indie devs 🙂 And do give me feedback about the tutorials, I love hearing from y’all!
Good luck,
Lindsey Reid @so_good_lin

In URP2D project, how do I play transparency when the player layer is blocked by the non-player layer, How to write shadergraph
LikeLike