

DISCLAIMER: Code presented here is pseudocode that does NOT necessarily reflect production Limit Theory code.
A quick intro to me: I’m a programmer at Procedural Reality, an indie game studio creating an infinite, procedural space exploration game called Limit Theory. You can follow @LimitTheory on Twitter if you want to see where these cool screenshots come from. In addition, all of the code presented here (in non-pseudocode form, lol) will be available and moddable once Limit Theory is released. So if you like this tutorial, be sure to keep in touch. ;0
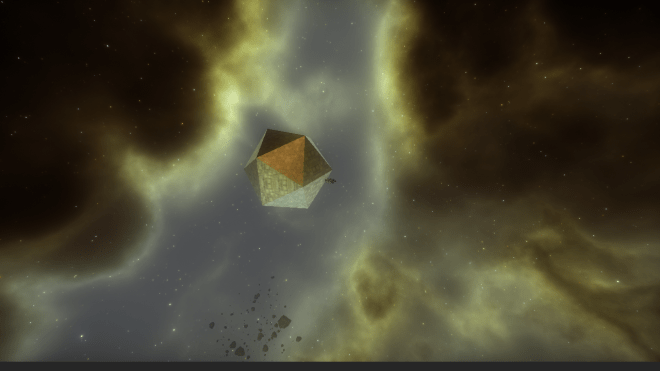
EVERYTHING in Limit Theory is procedurally generated- including all geometry, down to every vertex and triangle. My job is to create procedural space ships and space stations. I’ve been building up a library of basic shapes to be the building blocks of these ships and a library of warps to make these shapes ~interesting~.
Note: This tutorial assumes you have at least basic knowledge of 3D geometry and related math.
Today, I want to share with y’all an algorithm for stellation. For the purpose of this tutorial, stellation is the process of extruding a triangle to converge at a point, to create a tetrahedron- a pyramid made of 4 traingular faces. The word comes from similar roots to the word “star”, as when you apply it to a polyhedron, you end up with a star shape.
(ohmygod this illustration is terrible sorry it’s late at night and i don’t have photoshop on this computer)
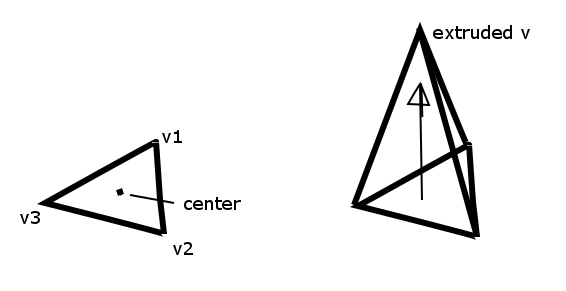
Before we stellate a whole mesh like in the banner photo, let’s focus on just one triangle. We’ll need to know the triangle’s 3 vertex positions. Let’s note this as three 3D vectors (or Vec3) called v1, v2, and v3 with x, y, and z coordinates.
First, we’ll need to define the axis that we want to extrude the face on. For that, we need to define the center position and surface normal of the triangle.
The center position of the triangle can be calcuated as the average position of all of the verticies. And you know how to do averages!! GGEZ.
center = Vec3()
center.x = (v1.x + v2.x + v3.x) / 3.0
center.y = (v1.y + v2.y + v3.y) / 3.0
center.z = (v1.z + v2.z + v3.z) / 3.0
Vec3 e1 = v2 - v1
Vec3 e2 = v3 - v2
Vec3 normal = e1:cross(e2)
normal = normal:normalize()
(PS: in my code for Limit Theory, I check to make sure the normal’s length is >0 to protect against bad triangles. You may want to do this too if your geometry is procedural :P)
Now that we have this information, we can perform the stellation! Firstly, we’re going to create the new vertex representing the tip of the pyramid above the original triangle; then, we’ll create the triangles that connect the verticies.
To create the new vertex, we want to position it in the triangle center, then add the surface normal to this position to extrude it. “h” in this pseudocode is an optional distance to extrude the vertex by. The bigger it is, the longer our resulting pyramid will be.
Vec3 newVertex = center + (normal * h)
To create the 3 triangles to complete the pyramid, we just need to make sure that we’re storing the indicies in the correct direction. Let’s call the indicies of v1, v2, and v3 -> i1, i2, and i3, respectively, and the index for the new vertex i4. If you haven’t already been doing this, drawing a picture helps massively with figuring out indicies. Assuming that you store indicies in a counter-clockwise direction (as we do on Limit Theory), the triangles are as follows:
tri1 = Tri(i1, i2, i4)
tri2 = Tri(i2, i3, i4)
tri3 = Tri(i3, i1, i4)
Finally, you’ll combine all of these verticies and indicies together in.. whatever way your API requires you create geometry. Make sure that you create a new mesh storing the three verticies from the original triangle, our new vertex, and our three new triangles. (You don’t need to add the original triangle indicies if you’re about to apply this algorithm to a bigger shape- usually, those will be completely hidden by our new triangles.)
The complete algorithm looks like this:
center = Vec3(
  (v1.x + v2.x + v3.x) / 3.0
  (v1.y + v2.y + v3.y) / 3.0
  (v1.z + v2.z + v3.z) / 3.0 )

Vec3 e1 = v2 - v1
Vec3 e2 = v3 - v2
Vec3 normal = e1:cross(e2)
normal = normal:normalize()

newMesh = Mesh()

-- old verticies
newMesh:addVertex(v1)
newMesh:addVertex(v2)
newMesh:addVertex(v3)

-- new vertex
newMesh:addVertex( center + (normal * h) )

-- new tris
newMesh:addTri(i1, i2, i4)
newMesh:addTri(i2, i3, i4)
newMesh:addTri(i3, i1, i4)
If you’ve gotten this far, you’ve got the hard part working. It only gets cooler from here: we just need to apply this to every triangle on a mesh. The tricky thing here is aligning the index locations correctly on our new mesh. For this algorithm, I add all of the original verticies first, then iterate on all of the old tris and extrude them 1 by 1, then add the extruded vertex & tris to the mesh. The key here is that I keep track of the index of the “new” vertex by incrementing it by 1 each time I add a new vertex. In addition, that index starts at the length of the old mesh’s vertex list. See the bolded parts of the complete algorithm below to see what I mean.
(PS, this pseudocode is a Lua / C++ mix. It’s exessively verbose for the purposes of this tutorial, and does not reflect production Limit Theory code.)
function Stellate (Mesh oldMesh)

newMesh = Mesh()

-- add ALL of the verticies from the old mesh
Vec3[] oldVerticies = oldMesh.verticies
for i = 1, #oldVerticies do
  newMesh:addVertex(oldVerticies[i])
end

-- create new stellated verticies & tris
local vi = #newMesh.verticies
for i = 1, #oldMesh.tris do
  -- old indicies
  int i1 = oldMesh.tris[i].i1
  int i2 = oldMesh.tris[i].i2
  int i3 = oldMesh.tris[i].i3
  -- old verticies
  Vec3 v1 = oldMesh.verticies[i1]
  Vec3 v2 = oldMesh.verticies[i2]
  Vec3 v3 = oldMesh.verticies[i3]

  -- center & normal
  center = Vec3(
   (v1.x + v2.x + v3.x) / 3.0
   (v1.y + v2.y + v3.y) / 3.0
   (v1.z + v2.z + v3.z) / 3.0 )
  Vec3 e1 = v2 - v1
  Vec3 e2 = v3 - v2
  Vec3 normal = e1:cross(e2)
  normal = normal:normalize()

  -- new vertex
  newMesh:addVertex( center + (normal * h) )

  -- new tris
  newMesh:addTri(i1, i2, vi)
  newMesh:addTri(i2, i3, vi)
  newMesh:addTri(i3, i1, vi)

  vi = vi + 1
end

return newMesh
end
WHEW!!!! You’re done!!!!!! Congrats if you got this working!!!!!!!
If done correctly, you should be able to make a mesh from something like this simple icosahedron:
To this stellated version:

Now comes the cool part: applying this same function over and over again to the same mesh for some stellar results.
If you enjoyed this tutorial, see any typos or bugs, or have any other feedback, leave me a comment or tweet at me! You can follow me here on WordPress or on Twitter @so_good_lin. And be sure to keep track of @LimitTheory on Twitter – when it comes out, the production version of all of this code & more will be available for exploring and modding. 🙂
DISCLAIMER: Code presented here is pseudocode that does NOT necessarily reflect production Limit Theory code.

4 thoughts on “Procedural Stellation Tutorial”