

Hey y’all, this tutorial series is going to cover all of the techniques used to create the foggy window shader! There’s quite a bit going on, so we’re going to break it down into 3 parts:
- The Gaussian blur effect
- Writing & reading a texture
- Changing the blur based on the texture
At the end of each part, you’ll have a fully working shader, and you’ll learn techniques that you can reuse and adapt in other shaders!
A little disclaimer- this section does a really lazy application for the blur for the purposes of focusing on part 2 and 3. It’s most useful if you’ve never written a blur before and want to learn a really basic (but lazy) way of applying it in Unity. If you’re already a pro at writing a blur shader, then go ahead and move on to part 2!
Here’s the full code for the foggy window shader for you to reference. You’ll also need to look at the DrawOnTexture script for the C# part of this tutorial, and the blurring algorithm is in blur.cginc.
On with the tutorial 🙂
Gaussian Blur
The foggy look of the window is achieved with a Gaussian blur and a slight color tint.
Basically, we’re going to grab the pixels already rendered in the camera behind the window using the GrabPass tag, and then apply the Gaussian blur algorithm to them.
Many people have already explained how a Gaussian blur works better than I can, so here’s a link to a tutorial on a Gaussian blur in GLSL that I used to write mine. Instead of focusing on how to write a blur algorithm, let’s look at how to adapt it for Unity specifically.
Using the GrabPass
We need to get the pixels behind the window in order to blur them, which we can do with Unity’s GrabPass. The GrabPass draws the pixels rendered behind the object to a texture that your shader can access. To use it, you’ll need to use the GrabPass tag inside your SubShader block:
SubShader
{
   // Also important to draw a transparent window!
   Tags
   {
      "Queue" = "Transparent"
   }

   // Grab the screen behind the object into _BGTex
   GrabPass
   {
      "_BGTex"
   }

   // ... other shader stuff...
Next, inside your CGPROGRAM tags, make sure you’re including the Unity.cginc file for a special GrabPass-reading function we’re going to use:
#include "UnityCG.cginc"
To be able to read the GrabPass texture, we need the proper texture coordinates. Unity makes this super easy with a ComputeScreenGrabPos function which gives us the proper texture coordinates to read the GrabPass texture given the clip space vertex position as input. We can do this calculation in the vertex shader:
vertexOutput output;
output.pos = UnityObjectToClipPos(input.vertex);
output.grabPos = ComputeGrabScreenPos(output.pos);
Applying the Blur (The Lazy Way)
Now we’re ready to read this texture in the fragment shader and apply the blur! I’m going to skip explaining how the Gaussian blur algorithm works, so let’s just assume you already went through a tutorial on blurring and have written a blur algorithm with the following parameters:
float4 gaussianBlur(
   float2 dir,
   float4 grabPos,
   float res,
   sampler2D tex,
   float radius
)
{
// blur algorithm goes here...
}
This algorithm is going to take the GrabPass texture (“tex”), apply the blur, and return a float4 pixel color for the result. Let’s look at what each parameter means, in case you’re a lil confused:
- float2 dir: The blur is applied in two passes, which is why we need the “dir” (direction) parameter- we apply once in the x-direction and once in the y-direction. It’s a float2 because we use (1, 0) to mean the x-direction and (0, 1) to mean the y-direction.
- float4 grabPos: The texture coordinates for the pixel to blur, which we calculated above.
- float res: The texture resolution in the axis we specified above (x or y).
- sampler2D tex: The texture to blur. We need the whole texture because the blur algorithm samples pixels nearby the original pixel.
- float radius: The distance from the original pixel to blur in. The higher, the stronger the blur will be.
Next, let’s define a few of the parameters we’ll need to control the blur.
We’ll need a float to define the strength of the blur, which I defined as _BlurRadius and also exposed to the material in the Properties block at the beginning of the shader.
We’ll also need the GrabPass texture, which needs to have the same name as whatever you called it in the GrabPass tag (in my case, _BGTex). You’ll also need the size information for the texture, which you can obtain by creating a property called _YourTextureName_TexelSize, which is defined in Unity documentation here.
I also added a slight dark blue tint to the blur to make it extra obvious where the blur is happening. If you want to use it, add a color to your Properties. I called mine _FogColor.
// Properties
// set in material
uniform float4 _FogColor;
uniform float _BlurRadius;
// grab pass
uniform sampler2D _BGTex;
uniform float4 _BGTex_TexelSize;
Now, we have all of the information we need to apply the blur to the background texture.
We’re going to apply the blur in two passes; one in the x-direction, and the other in the y-direction. I’ll admit that this blur is a little bit lazy; normally, we would want the second blur pass to blur the results of the first blur, and not the original background image. However, this would take a little more shader wizardry and would get more complicated, and I want this tutorial to focus on the second technique used to get the blur fading over time.
So, instead, I’m going with a lazy interpretation of the blur and instead blur the original image separately in both directions and add the results. Know that the downsides to this approach are that 1) the blur is lower quality and 2) the result is brighter than the original image because you’re adding the results.
I chose to multiply by the tint color because I want to darken the blurred areas a little bit to make up for my lazy blur technique, but you can use whatever blending technique you want for both combining the results and applying the tint.
(Note that _TexelSize contains the xy size of the texture in the .zw properties.)
float4 blurX = gaussianBlur(float2(1,0),
                            input.grabPos,
                            _BGTex_TexelSize.z,
                            _BGTex,
                            _BlurRadius);

float4 blurY = gaussianBlur(float2(0,1),
                            input.grabPos,
                            _BGTex_TexelSize.w,
                            _BGTex,
                            _BlurRadius);

return (blurX + blurY) * _FogColor;
(P.S. – If you’d like to see a tutorial on doing blur the right way, comment below or Tweet at me!)
Results
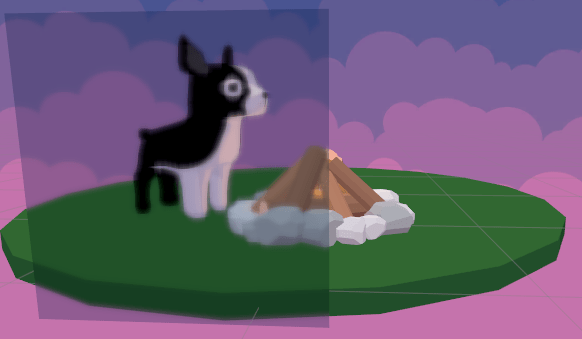
Apply this shader to a material and attach it to a flat plane in your scene.
Your shader should now be performing a basic blur! If you’re not seeing the results you want, mess around with the _BlurRadius and _FogColor properties (which you exposed to the material, right? ;D).
Here’s a preview of what the foggy window looks like.
Writing & Reading a Texture
To affect how the shader looks based on mouse interaction, we need to write the mouse movements to a texture and read that texture in the shader.
For now, all we’re going to do is write the mouse position to the texture and read that texture in the shader, without applying any of the special effects. In the last part of this tutorial, we’ll learn how to encode the time the mouse position was written and use that to fade the blur.
Reading the Texture in the Shader
Firstly, in our shader, let’s create a sampler2D property called _MouseMap (which you do not need to expose to the material in the Properties block).
uniform sampler2D _MouseMap;
And in our fragment shader, for debug purposes, let’s draw that texture.
float4 mouseSample = tex2D(_MouseMap, input.texCoord.xy);
This is all we’ll need to do in the fragment shader for this part of the tutorial while we learn how to get texture reading & writing working- no need to apply blur or anything just yet!
Without anything writing to your _MouseMap property, you probably now have an opaque grey plane:

Writing to the Texture in C#
To write to this texture, we’ll need to create a new C# script and attach it to your plane.
The Material.Set[whatever] functions are how you set shader properties from C# code! You just need to make sure the string name of the property matches its name in the shader.
public class DrawOnTexture : MonoBehaviour {

    // set these in the Inspector!
    public Renderer destinationRenderer;
    public int TextureSize;
    public Color BlurColor;

    private Texture2D texture;

    void Start ()
    {
        // create a new Texture2D
        texture = new Texture2D(TextureSize, TextureSize, TextureFormat.RFloat, false, true);

        // set all the pixel values to some default color
        for (int i = 0; i < texture.height; i++)
        {
            for (int j = 0; j < texture.width; j++)
            {
                texture.SetPixel(i, j, BlurColor);
            }
        }

        // actually apply the SetPixel stuff we just set
        texture.Apply();

        // pass this texture info to the material
        destinationRenderer.material.SetTexture("_MouseMap", texture);
    }
}
I chose black for my BlurColor, so my scene now looks like this after hitting play:

Writing the Mouse Position
Let’s add an OnMouseDrag() function to draw a circle around the mouse position when the player clicks and drags on our plane. Make sure you have a MeshCollider attached to your plane object so that it’ll receive the OnMouseDrag() event.
void OnMouseDrag ()
{
   // make a ray from the mouse position 'into' the screen
   // and test for a hit with the texture
   Ray ray = cam.ScreenPointToRay(Input.mousePosition);
   RaycastHit hit;

   if(Physics.Raycast(ray, out hit, 100))
   {
      Color color = new Color(1, 0, 0, 1);

      // convert from texture coordinates to pixel coordinates
      int x = (int)(hit.textureCoord.x * texture.width);
      int y = (int)(hit.textureCoord.y * texture.height);

      // write to pixel that was hit
      texture.SetPixel(x, y, color);

      // write to adjacent pixels within Radius
      for (int i = 0; i < texture.height; i++)
      {
         for (int j = 0; j < texture.width; j++)
         {
            float dist = Vector2.Distance(new Vector2(i,j),
                                          new Vector2(x,y)
            );

            if(dist <= Radius)
               texture.SetPixel(i, j, color);
            }
      }

      // apply the changes & let the shader know
      texture.Apply();
      destinationRenderer.material.SetTexture("_MouseMap", texture);
   }
}
Now, when you press Play, you should be able to draw on the texture with your mouse! 😀
Putting it Together
Now we’re prepared to actually change the blur based on the mouse drag texture we just created.
Applying Blur Based on the Mouse Drag Texture
Let’s go back to our shader and apply our blur amount based on the value we read from the texture. Since we’re drawing red where the mouse has clicked, and the texture is black by default, we can change the blur and color tint amount based on the red channel.
More specifically, we want to multiply:
_BlurRadius * (1 - red channel)
Since the red channel is a value between 0-1, this will make the blur radius smaller the larger the red value is. In this case, the red channel will either be 0 or 1, so it’ll basically turn the blur off where the red is drawn.
The tint color follows the same theory, except you’ll want to define a _ClearColor for where the fog isn’t applying.
// r = 1 -> mouse click
// r = 0 -> no mouse
float blurRadius = _BlurRadius * (1-mouseSample.r);
float4 color = mouseSample.r*_ClearColor + (1.0-mouseSample.r)*_FogColor;

float4 blurX = gaussianBlur(float2(1,0),
                            input.grabPos,
                            _BGTex_TexelSize.z,
                            _BGTex,
                            blurRadius);

float4 blurY = gaussianBlur(float2(0,1),
                            input.grabPos,
                            _BGTex_TexelSize.w,
                            _BGTex,
                            blurRadius);

return (blurX + blurY) * color;
You should now be able to draw in the window and clear the blur and tint wherever you clicked!
So, you could probably stop there and have a perfectly cute foggy window shader… But what fun is it to NOT over-complicate things???
Time Algorithm
Before we get back to the shader, let’s think about the theory of how this will work. Basically, we need to change the blur amount based on how long ago a particular pixel was clicked. A “younger” pixel time value means it was clicked more recently, and thus should be less foggy.
We also need a maximum age to define how quickly the pixel fogs back up. This value will also be used to convert our age into a normalized (0-1) value, which we need to modulate the blur amount between its minimum and maximum values.
Our algorithm looks like this:
age = current time - time drawn
percent max age = age / max age
Then, we’re going to apply this normalized “percent max age” value to our blur radius and tint. The younger the pixel time value, the smaller percent max age will be, which makes the blur strength smaller.
Similarly, we’ll use a smaller portion of the tint color and a larger portion of the clear color based on the percent max age value.
blur radius = max radius * percent max age
tint = (1 - percent max age)*(clear color) + (percent max age)*(fog color)
Applying Time
To apply this to our shader, let’s first write the time the pixel was drawn into the r-channel of our mouse map texture (instead of just writing 1.0).
Color color = new Color(Time.timeSinceLevelLoad, 0, 0, 1);
Next, in our shader, let’s apply our algorithm from above to obtain the percent max age value.
// get the time the pixel was drawn from the mouse click texture
float timeDrawn = tex2D(_MouseMap, input.texCoord.xy).r;
// age = current time - time drawn
float age = clamp(_Time.y - timeDrawn, 0.0001, _Time.y);
// percent max age = age / max age
float percentMaxAge = saturate(age / _MaxAge);
And finally, let’s apply our percent max age to the blur radius and tint color.
// older = higher percentMaxAge = more blur
float blurRadius = _BlurRadius * percentMaxAge;
float4 color = (1-percentMaxAge)*_ClearColor + percentMaxAge*_FogColor;
Your blur should now return with time based on the max age that you defined! Here’s the blur fading super quickly with _MaxAge set to 1 second.
Fin
You did it!!! You’ve discovered how to encode information other than color into a texture, and how to utilize it for some cool special effects. I hope this revelation was as cool to you as it was to me 🙂
Here’s the link to the full code for the foggy window shader, the DrawOnTexture script, and the blurring algorithm in blur.cginc.
If y’all have any questions about writing shaders in Unity, I’m happy to share as much as I know. I’m not an expert, but I’m always willing to help other indie devs 🙂 And do give me feedback about the tutorials, I love hearing from y’all!
Good luck,
Linden Reid @so_good_lin

Thank you
LikeLike