

DISCLAIMER #1: Code presented here is pseudocode that does NOT necessarily reflect production Limit Theory code.
DISCLAIMER #2: This tutorial assumes you have at least basic knowledge of 3D geometry and related math.
Sometimes, we want to add detail to a mesh without changing its shape. We may need to break up polygons with lots of verticies into triangles, a necessary step before handing it to the renderer; or prepare a mesh for a warp like stellation or extrusion to ensure that it’ll have lots of small details. This is where tessellation and triangulation come in handy! The algorithms I’m going to be showing in this tutorial break up the polys that make up a mesh without changing the shape of the mesh.
Tessellation and triangulation can mean complicated, fancy things to people who are mathematicians and computer scientists studying complicated, fancy things like computational geometry. BUT, I’m not one of those people, and I don’t think that the majority of people making games or dipping their toes into procedural geometry are! This post is focused on the visually pleasing application of these algorithms for procedural 3D geometry, and it is not focused on using all the correct scientific terminology. So, disclaimer, maybe don’t try to base your Stanford 3D graphics paper on this blog post. But DO use it to get better acquainted with procedural geometry, make cool shapes, and have fun!
There are 3 algorithms that we are going to learn today: Fan, Centroid, and Triforce.
(again… these are NOT the scientific names for these algorithms… LOL)

Fan Triangulation
The fan-shaped triangulation is great as a last step before handing a mesh to a renderer. It breaks down high-order polys (polygons with >3 indicies) into tris without adding any new verticies. Storing the mesh with as little data as possible allows us to save memory space, and anything that processes the mesh (like the renderer!) spends less time traversing it.
This algorithm is useless on triangles, but is useful on any polys with > 3 indicies.
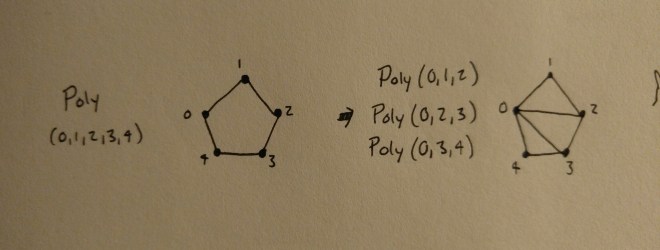
The illustration below the pseudocode shows an example of this algorithm breaking up a 5-index poly into three 3-index polys. The original poly is on the left, and the new ones are on the right.
To create the new triangles that create the fan shape, the algorithm connects the first index in the mesh to every index between the second and second-to-last positions in the poly. The lines that do this are bolded below. It creates a new poly to store those connections and adds that poly to the end of the poly list.
function triangulateFan (mesh)
  -- visit every poly in the mesh
  for i = 1, #mesh.polys do
    local poly = mesh.polys[i]
    -- visit every index between the second and second-to-last indicies
    for j = 1, #poly - 2 do
      mesh.polys[#mesh.polys+1] = { poly[0], poly[j + 1], poly[j + 2] }
    end
    mesh.polys[i] = { poly[0], poly[1], poly[2] }
  end
end
Centroid Triangulation
Centroid-based triangulation is a slightly more attractive way to break up high-order polys into triangles. The header image used centroid triangulation on a cube made of 4-index polys before extruding it. By more attractive, I mean that if we proceed to apply a warp to this mesh, or extrude all of the faces of the tris we created, they’ll look more predictable and even. Notice how the fan triangulation above creates small angles next to the index that was used as the base of the fan; and notice how in contrast, centroid triangulation does a slightly better job of creating similarly-sized angles. Of course, beauty is subjective, so it’s good to have options for different types of triangulations, so that you can use whatever suits your particular algorithm best.
This triangulation is useful on both triangles and polygons with > 3 indicies.
To figure out how to triangulate a poly around its centroid, we first need to define the centroid. There are a couple of different ways you could define the “center” of the poly. For the sake of simplicity, let’s define the center of the poly as the average of the vertex positions in the poly. That algorithm could look like:
-- 'poly' is an array of indicies
function getFaceCentroid(mesh, poly)
  local c = Vec3(0, 0, 0)
  -- add all of the values of the verticies
  for i = 1, #poly do
    c:add( mesh:getVertex(poly[i]) )
  end
  -- divide by the number of verticies
  -- to get the average!
  c:div(#poly)
  return c
end
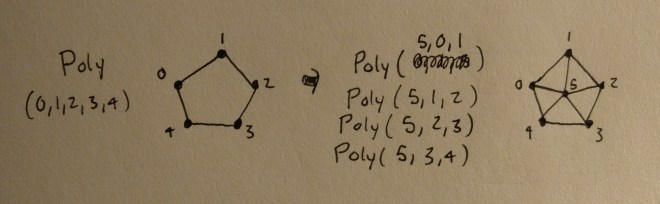
Now, let’s write the triangulation function. The algorithm creates triangles out of the centroid and the verticies at the edges of the polygon, making sure to move in a counter-clockwise direction around the poly. (Substitute counter-clockwise with clockwise if that’s what your ‘front face’ winding order is.) The lines that do this are bolded below. It creates a new poly to store those connections and adds that poly to the end of the poly list.
function triangulateCentroid(mesh)
  -- traverse all of the polys in the mesh
  for i = 1, #mesh.polys do
    -- poly is an array of indicies
    local poly = mesh.polys[i]

    -- add vertex to the center
    local c = mesh:getFaceCentroid(poly) -- defined above
    self:addVertex(c.x, c.y, c.z)

    -- create tris connecting all verts to the center vert
    local ci = #mesh.verts -- index of center point
    for j = 0, #poly - 2 do
      mesh.polys[#mesh.polys+1] = { ci, poly[j], poly[j + 1] }
    end
    -- replace the original poly
    -- with the last tri connecting the first and last poly index
    mesh.polys[i] = { ci, poly[#poly], poly[1] }
  end
end
Triforce Tessellation
I haven’t called the other algorithms “tessellations” because this is the first algorithm that actually produces a regular tessellation if applied to an equilateral triangle. Even on non-equilateral triangles, this algorithm preserves the angles of the original shape, which I believe is the best way to break up a mesh to add detail to it.
This implementation can only be applied to triangles, so in Limit Theory, we apply a centroid triangulation to any higher-order polys before applying a round of triforce & quad tessellations in order to add detail to a mesh.
function triangulateTriforce (mesh)
  -- edge map to keep track of verticies
  -- we create at each loop
  -- to avoid creating duplicate verts
  local edgeMap = {}

  for i = 0, #mesh.polys do
    local poly = self.polys[i]

    -- list for new verticies we create
    local verts = {}

    for j1 = 0, #poly do
      local j2 = j1 % #poly
      local v1 = poly[j1]
      local v2 = poly[j2]
      -- index of edge vertex we need
      local ei = math.min(v1, v2) * vc + math.max(v1, v2)
      -- if the edge map doesn't already
      -- have an entry at this point, then...
      if not edgeMap[ei] then
        -- create an entry in the edge map at this point
        edgeMap[ei] = self:getVertexCount()
        -- and add a new vertex to the mesh
        local p = self:getVertex(v1):lerp(self:getVertex(v2), 0.5)
        self:addVertex(p.x, p.y, p.z)
      end
      -- add our new point to the vertex list
      verts[#verts + 1] = edgeMap[ei]
    end

    -- create 4 new triangles
    -- connecting all of the original points
    -- with the new edges points we created!
    self:addTri(verts[0], poly[1], verts[1])
    self:addTri(verts[1], poly[2], verts[2])
    self:addTri(verts[2], poly[0], verts[0])
    -- center triangle,
    -- used here to replace the data in the original poly
    poly[1] = verts[0]
    poly[2] = verts[1]
    poly[3] = verts[2]
  end
end

Fin
Congrats, you reached the end of the tutorial! If you implemented any of these triangulations, you hopefully learned a lot about how triangles can be created and manipulated. Now that your mesh is prepped for adding detail, maybe try like stellating or extruding all of those tris? 😉
If you enjoyed this tutorial, see any typos or bugs, or have any other feedback, leave me a comment or tweet at me! You can follow me here on WordPress or on Twitter @so_good_lin. And be sure to keep track of @LimitTheory on Twitter – when it comes out, the production version of all of this code & more will be available for exploring and modding. 🙂
DISCLAIMER: Code presented here is pseudocode that does NOT necessarily reflect production Limit Theory code.

One thought on “Simple Mesh Tessellation & Triangulation Tutorial”