

Hey y’all! Today, I want to show you how I created this ice / crystal shader. There are three parts to this effect:
- The transparency with opaque, white edges
- The iridescent bumpy texture
- The distortion effect behind the ice
All of these effects are reusable for other kinds of shaders.
For example, if you’re successful, you’ll be able to apply the distortion effect to anything, like the water shader!
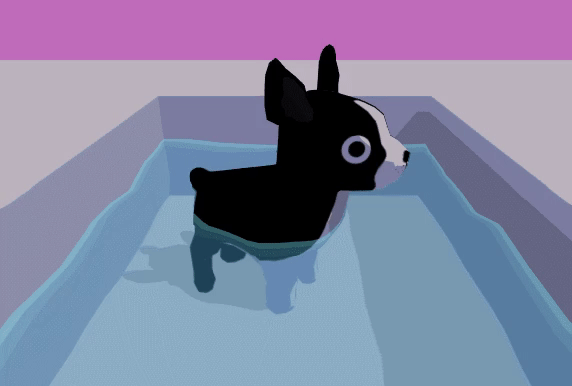
For your reference during the tutorial, here’s the final code for the shader.
–> Link to final code for Unity Ice Shader
Transparency & Opaque Edges
I actually covered the opaque edge effect in a different post, but I’m going to re-explain here since this effect is slightly different. If you’re looking at the full code, this is under the ‘transparent color & lighting pass’ in the fragment shader. In case you wanna look it up, the effect used here is a very simple Fresnel Effect.
First of all, let’s make sure we have our pass set up properly for transparency:
Tags {
"Queue" = "Transparent" // important for Unity!!
}
Cull Off // this is optional, I think it looks good with ice
Blend SrcAlpha OneMinusSrcAlpha // standard alpha blending
Make sure your vertex shader is passing the necessary information to the fragment shader by computing the position, normals, and view direction in world space:
output.pos  = UnityObjectToClipPos(input.vertex);
float4 normal4 = float4(input.normal, 0.0);
output.normal = normalize(mul(normal4, unity_WorldToObject).xyz);
output.viewDir = normalize(_WorldSpaceCameraPos - mul(unity_ObjectToWorld, input.vertex).xyz);
Now, let’s write the fragment shader.
For every pixel, to determine how opaque that pixel should be, we’re going to compute the dot product between the surface normal and the view direction. The closer to being perpendicular with the view direction the surface normal is, the closer their dot product will be to 0.
// input.viewDir and .normal are defined in the vertex shader
float edgeFactor = abs( dot(input.viewDir, input.normal));
With that in mind, we can compute the silhouette opacity:
// _Color is a color property
// min() clamps the value to be < 1.0
float opacity = min(1.0, _Color.a / edgeFactor);
// taking the pow(opacity) makes the opacity dropoff happen faster,
// so that only the very edges are opaque
// _EdgeThickness is a float property
opacity = pow(opacity, _EdgeThickness);
In addition, I like to change the color of the edges. Since I’m going for a stylized ice look, I’m sampling a ramp texture to determine the color. Here’s the ramp texture I used. As you can see, the values closer to x = 0.0 (on the far left) are dark, and the values closer to x = 1.0 are white.

Here’s how we use edgeFactor to sample the ramp texture. (You could also use edgeFactor for a smooth color instead of sampling a texture.)
// only using oneMinusEdge here because of
// how the ramp texture is set up, lol
float oneMinusEdge = 1.0 - edgeFactor;
// _RampTex is a sampler2D property
// the y-pos doesn't really matter here; keep it constant
float3 rgb = tex2D(_RampTex, float2(oneMinusEdge, 0.5)).rgb;
If you output flaot4(rgb, opacity) in the fragment shader, you should have just the transparency and edge effect working! Toy with your settings on the _EdgeThickness to see what works well, and don’t forget to set your tags correctly for transparency.
Bump Mapping
Normal mapping is a super common effect used in shaders in order to make a mesh look like it has a lot of detail without using more polygons. The mesh used for the ice dog doesn’t actually have bumps in it! I’m sampling what’s called a normal map, which is a texture that encodes normal directions in colors. You then use those normal directions for lighting, without needing to read polygon normals! This sounds fancy, but the normal map (AKA bump map) that I used is a lazy noise texture, LOL.
Firstly, let’s make sure our vertex shader is passing the texture coordinates to our fragment shader:
// float3 stored in TEXCOORD0 in the vertex input struct
output.texCoord = input.texCoord;
Now, let’s start the fragment shader.
First, let’s sample the bump texture at our texture coordinates and ADD THE INPUT NORMALS. Adding the input normals is what makes the bump lighting change as the dog rotates! Otherwise, your bumps will look the exact same as the object moves. Placing the bumps on top of the input normals is what gives the iridescent effect that ice has.
float3 bump = tex2D(_BumpTex, input.texCoord.xy).rgb + input.normal.xyz;
I’m also using a ramp shader for this part of the effect for the bumps. Since I’m going for a cartoony effect, I think that cel shading looks super good on these bumps. So, let’s compute the dot product between the light direction and our bump direction and sample the ramp shader:
// this light provided by Unity- make sure to normalize!
float3 lightDir = normalize(_WorldSpaceLightPos0.xyz);
// get our sample location
float ramp = clamp( dot(bump, lightDir), 0.001, 1.0);
// sample the ramp texture
// make opacity whatever, we're not using this opacity
float4 lighting = float4(tex2D(_BumpRamp, float2(ramp, 0.5)).rgb, 1.0);
Finally, let’s combine the edge effect from the above section (“rgb” and “opacity”) with the lighting we’ve determined from our bump mapping (“lighting”) to get the final output for our fragment shader!
return float4(rgb, opacity) * lighting;
Ta-daa! You’ve got one whole pass for this shader complete. You could stop here and have some good looking ice, or add the next pass for the distortion effect.
Distortion Effect
We need to write a whole new pass for the distortion effect. This pass will go BEFORE the pass for the regular color & lighting pass described above.
Basically, we’re going to grab the background texture that’s already been rendered behind the ice, distort the vertex positions, and then draw it. We get the background contents using Unity’s grab pass.
To get the background texture of this shader, we need to use the GrabPass tag, right after SubShader:
GrabPass
{
  "_BackgroundTexture"
}
And make sure to add the background texture to your properties list, and make sure to include UnityCG.cginc for the special grab pass function we’ll be using:
#include "UnityCG.cginc"
sampler2D _BackgroundTexture;
float _DistortStrength;
Now, we’re ready to start the vertex shader. First, we need to convert the vertex position to world space. Then, we use that position to get the screen coordinates for the fragment shader to later sample the background texture.
output.pos = UnityObjectToClipPos(input.vertex);
output.grabPos = ComputeGrabScreenPos(output.pos);
Now, let’s distort the sample position. You could probably do this in fancier ways based on vertex position and angle and whatever, but I’m gonna be lazy and just sample the bump texture based on our texture coordinates.
float3 bump = tex2Dlod(_BumpTex, float4(input.texCoord.xy, 0, 0)).rg;
output.grabPos.xy += bump.xy * _DistortStrength;
Finally, in the fragment shader, let’s sample the background texture based on the distorted positions.
return tex2Dproj(_BackgroundTexture, input.grabPos);
With all of this code in a pass before the transparent color & lighting pass, your shader should work!
Fin
Woooooo!! This has got to be my longest tutorial yet! :0 We covered so many effects, with so many uses for other shaders. Here’s the full code again, under an open-source license.
If y’all have any questions about writing shaders in Unity, I’m happy to share as much as I know. I’m not an expert, but I’m always willing to help other indie devs 🙂
Good luck,
Lindsey Reid @so_good_lin
PS, here’s the Unity graphics settings for this tutorial.

I really love this post, can i translate this post into Chinese? I promise it will be non-commercial, without ads and fee.
LikeLike
Sure, as long as you link back to the original post! And send me a link when you’re done so I can Tweet it 😀
LikeLike
https://zhuanlan.zhihu.com/p/37696836, this is the CHN Version of this post.
I learned a lot from your post, thank you very much.
Can I translate other posts?
LikeLike
Sorry for the slow reply!!! You absolutely may 😀
LikeLike
Hi Lindsey.
I am interested in your tutorial and wanna to read more tutorial, but I can’t patreon u. what should i do?
LikeLike
Nice job friend, but this shader don´t work on ios dev on Unity 2019.3 😦
LikeLike
I know this is really old and you might not reply, but how to I make this shader go dark when in a dark setting? The color of the ice is always bright.
LikeLike